Getting started
Retail POS is a till that lives inside the WooCommerce admin you already log into. It sells your existing products, at your existing prices, under your existing tax rules — and a counter sale is an ordinary WooCommerce order. There is no second catalogue and nothing to sync at closing time.
Requirements
| Requirement | Version / note |
|---|---|
| WordPress | 6.2 or newer |
| PHP | 7.4 or newer |
| WooCommerce | Installed and active, 7.0 or newer. High-Performance Order Storage (HPOS) and classic post storage both work. |
| Who can use it | Anyone who can manage WooCommerce — the Shop manager role and administrators. Nobody needs a full admin account to work the till. |
| Browser | Any current browser. Scanning with a phone or tablet camera needs the site to be served over HTTPS — browsers only release the camera on a secure connection. |
| Connection | The POS is a WordPress admin screen: every scan, search and sale is a request to your site. It does not work offline. |
Install
- Install the free plugin In your dashboard go to
Plugins → Add New, search for Retail POS for WooCommerce, then install and activate. Or download it from WordPress.org and upload the zip. - Find the menu A Retail POS item appears in the WordPress admin sidebar, just below Products. Its sub-items are Sell, Dashboard, Orders, Returns, Labels, Settings and Help & support, plus an Upgrade ➤ link while you are on the free version — eight items in all.
- Check Settings once Open
Retail POS → Settingsand go through the four cards below. Two minutes here saves an argument at the counter later. - Sell something Open
Retail POS → Sell, scan or search an item, tap a payment button. That is the whole loop.
The free plugin needs no account, no API key and no licence check. It talks to your own WordPress database and to nothing else. If you remove it, your products, stock, customers and orders stay exactly as they are — they were WooCommerce's all along.
First run: what to check in Settings
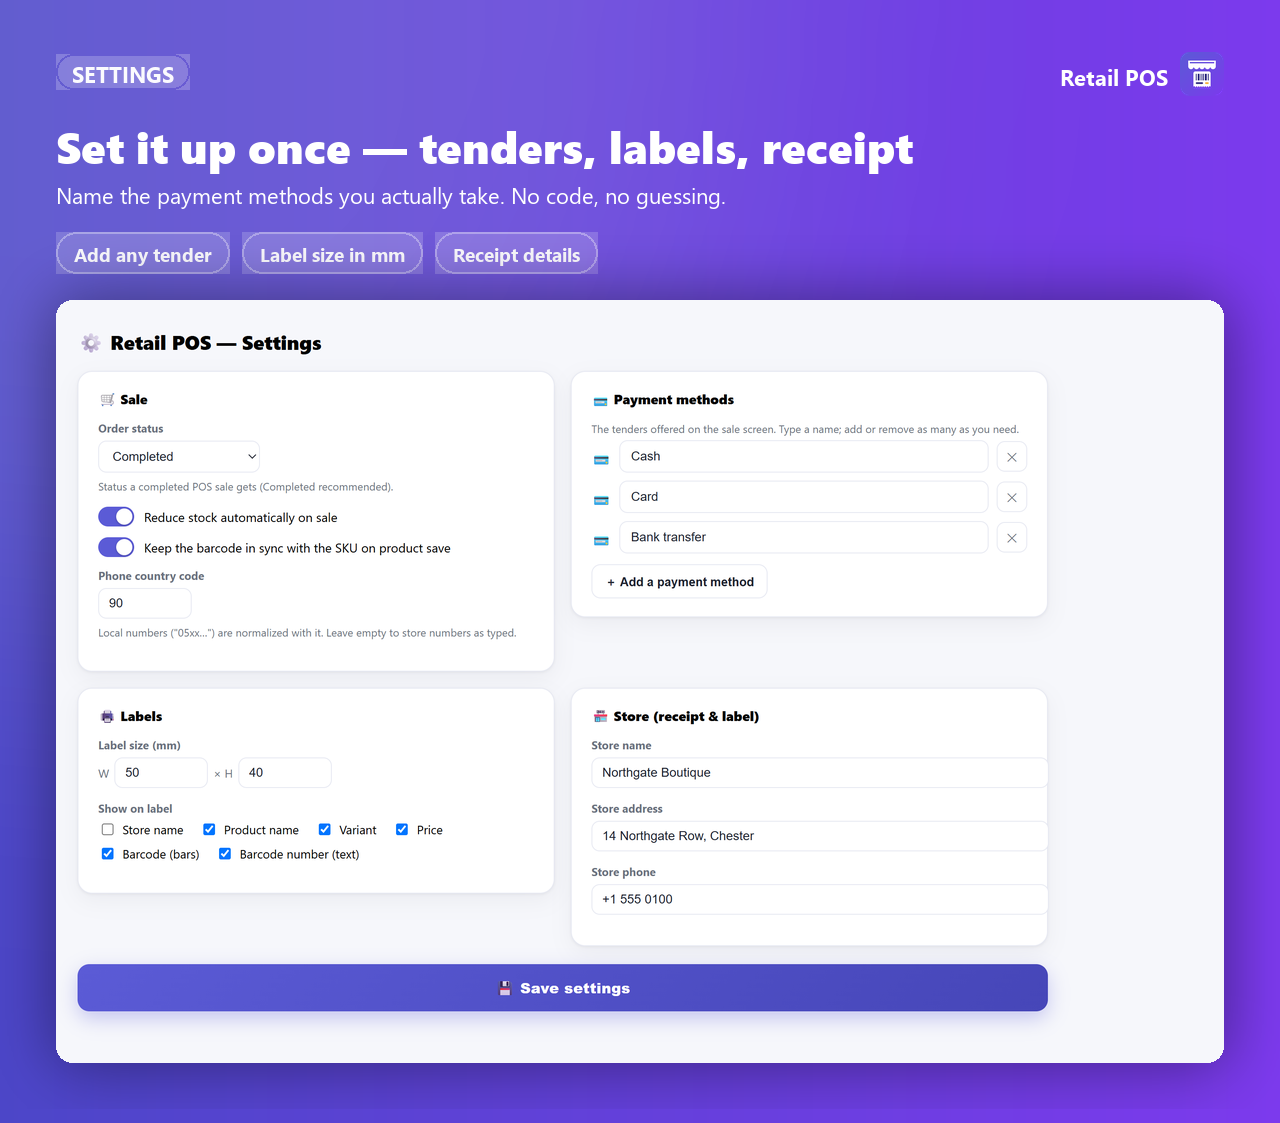
| Setting | What it does | Default |
|---|---|---|
| Order status | The status a completed POS sale is given. Choose Completed, Processing or On hold. | Completed |
| Reduce stock automatically on sale | Takes stock down through WooCommerce core when a sale completes — and puts it back on a return. Turn it off and neither direction touches stock. | On |
| Keep the barcode in sync with the SKU | When a product or variation is saved, its SKU is mirrored into the barcode field, so scanning the SKU just works. | On |
| Phone country code | Local numbers such as 05xx… are normalised with it. Leave it empty to store numbers exactly as typed. | empty |
| Payment methods | The tender buttons on the sale screen. Free text — rename, add or remove as many as you need. | Cash, Card, Bank transfer |
| Label size and content | Label width and height in millimetres, and which of store name, product name, variant, price, barcode bars and barcode digits appear on it. | 50 × 40 mm |
| Store name, address, phone | The header printed on every receipt (and available on labels). | Site title |
Set the store name, address and phone — they are what a customer reads at the top of the receipt — and name your payment methods the way your staff say them out loud. Renaming a method later keeps its internal key, so last month's orders stay attached to the same tender.
The sale screen
Open Retail POS → Sell. The left half finds products; the right half is the sale you are building.
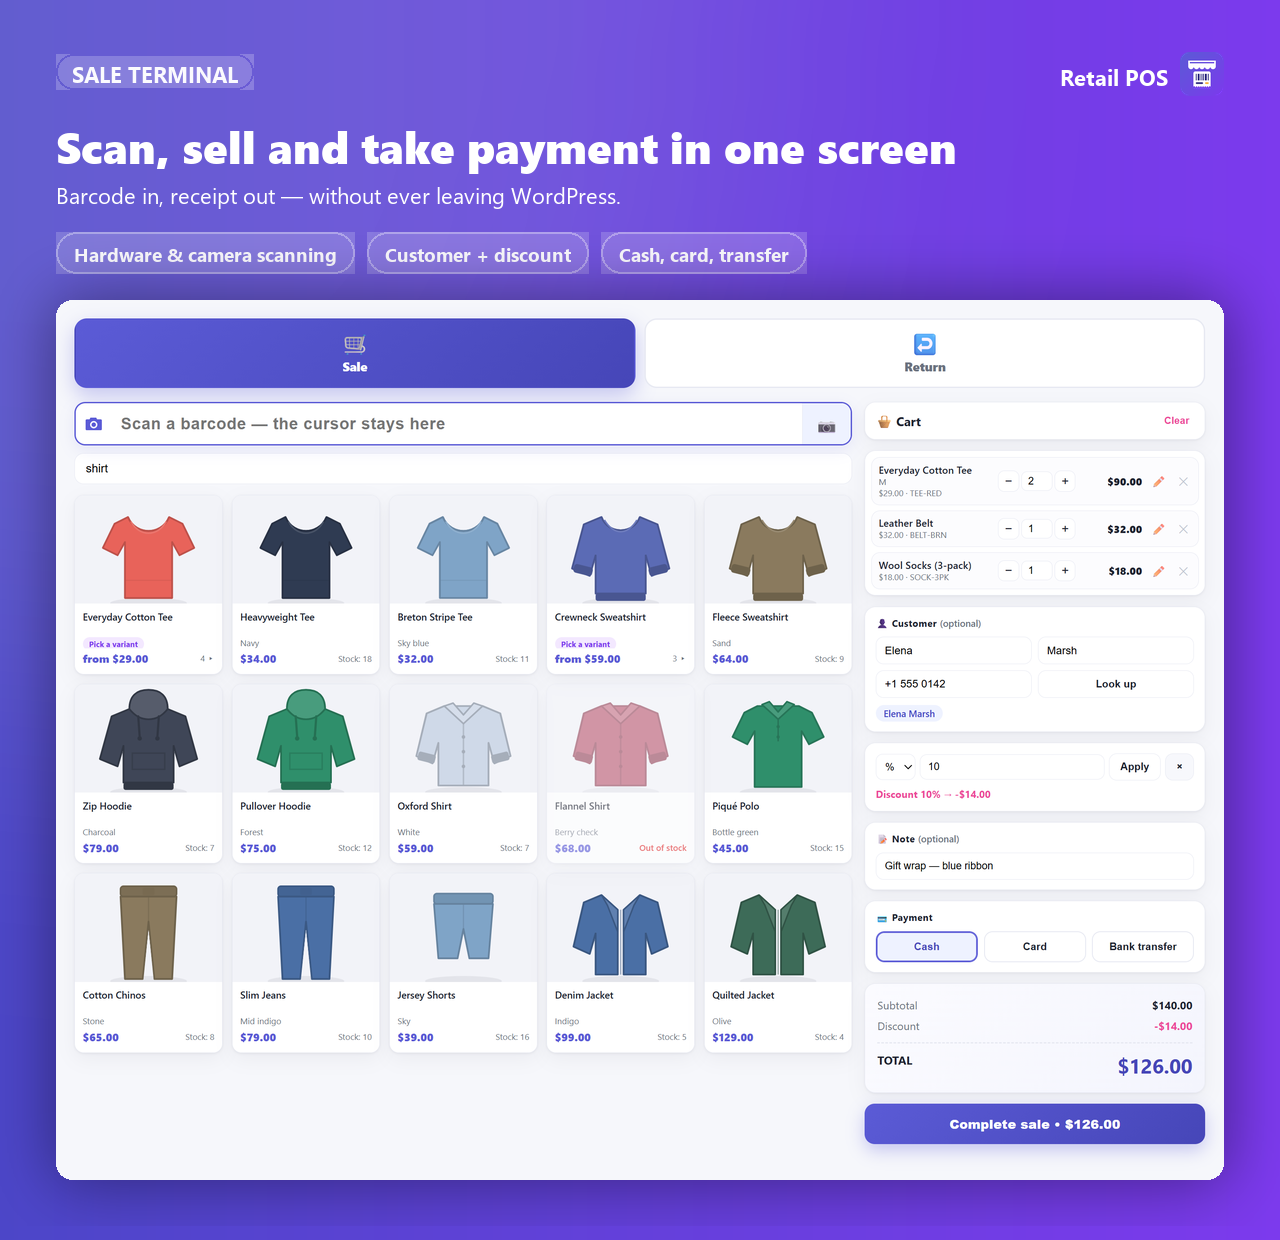
The scan box, and why the cursor comes home
- The scan box takes focus the moment the screen opens, and clicking any empty space on the screen sends focus straight back to it. Between customers, nobody has to hunt for the field.
- It fires by itself once four or more characters have landed, so a scanner gun with no Enter suffix works out of the box. Pressing Enter fires it too.
- After every scan the box empties itself and waits for the next one.
Searching by name or SKU
Under the scan box is a search field for products without a barcode, or for the ones you know by name.
- Type two characters or more. Every word you type must appear somewhere in the product title.
- A single-word search also matches part of a SKU, a barcode or a GTIN — handy when you only remember the last few digits.
- Results show as cards with the image, name, price and stock. Tap one to add it.
The variant picker
A variable product (a parent with sizes or colours) is never sellable on its own. Its card opens a variant picker that lists every variation with its price, its remaining stock and its barcode — so the sizes are on the screen instead of in the cashier's head. Pick one and it drops into the cart.
Scanning works the other way round: if the code belongs to a variation, that exact variation is added — a variation always wins over its parent.
The cart, quantity and the stock cap
- Change quantity three ways: the − button, the + button, or by typing the number straight into the box.
- Scanning the same item again adds one more.
- A line for a stock-managed product is capped at the stock on hand, with a warning showing the figure it stopped at, so a busy counter cannot quietly oversell. Products that do not manage stock have no cap — WooCommerce does not know a number to stop at.
- ✕ removes a line; Clear empties the cart.
- An optional Note field is saved on the order as an order note.
Quick edit, mid-sale
The pencil on a cart line opens a small editor for price, sale price, stock and cost, and writes straight back to the WooCommerce product or variation. It is meant for the moment a customer points at a shelf label that disagrees with the till.
- Tick apply to all variations and the new price, sale price and cost are copied to every sibling variation, and the parent's price range is refreshed afterwards.
- Typing a stock figure switches stock management on for that item and flips its in-stock status to match.
- Cost is stored as Cost of Goods data (
_wc_cog_costand_cost). The free version only records it — there are no margin or profit figures anywhere in free.
The editor opens at the price as it is displayed to you, and the server converts your figure back to WooCommerce's own entry basis before saving. Opening a line and saving it without touching anything leaves the price exactly where it was, whichever way your shop enters and displays prices.
Discounts, and how tax is handled
- One manual discount applies to the whole sale: choose % or your currency symbol, type the figure, press Apply. The × button removes it.
- The figure is recomputed and re-capped on the server — a percentage is clamped to 0–100 and a fixed amount can never exceed the total — so a fiddled browser cannot invent a bigger one.
- The discount scales every line total down proportionally instead of adding a negative fee line. That is what keeps VAT correct even when the basket mixes tax rates.
- The discount and its label are stored on the order and printed on the receipt.
Every figure the terminal shows — each cart line, the Subtotal and the Complete sale button — is the tax-inclusive amount the customer actually hands over, even if your shop displays prices excluding tax everywhere else. Items ring up at the product's own WooCommerce price and the tax is calculated by WooCommerce itself, so your rates, classes and rules apply unchanged.
Payment and completing the sale
- Pick a payment method The tender buttons come from Settings. FREE A sale is settled by exactly one method covering the full total; anything short of the total is refused. Splitting a payment is a Pro feature.
- Press “Complete sale” A real WooCommerce order is created, tagged as a POS sale, given the status you configured (Completed by default) and marked paid. Stock comes down through WooCommerce core, so lookup tables and integrations stay correct.
- Read the confirmation The screen that follows shows the order number and the total, the remaining stock of what you just sold, a Print receipt button and New sale — which closes the panel and puts the cursor back in the scan box.
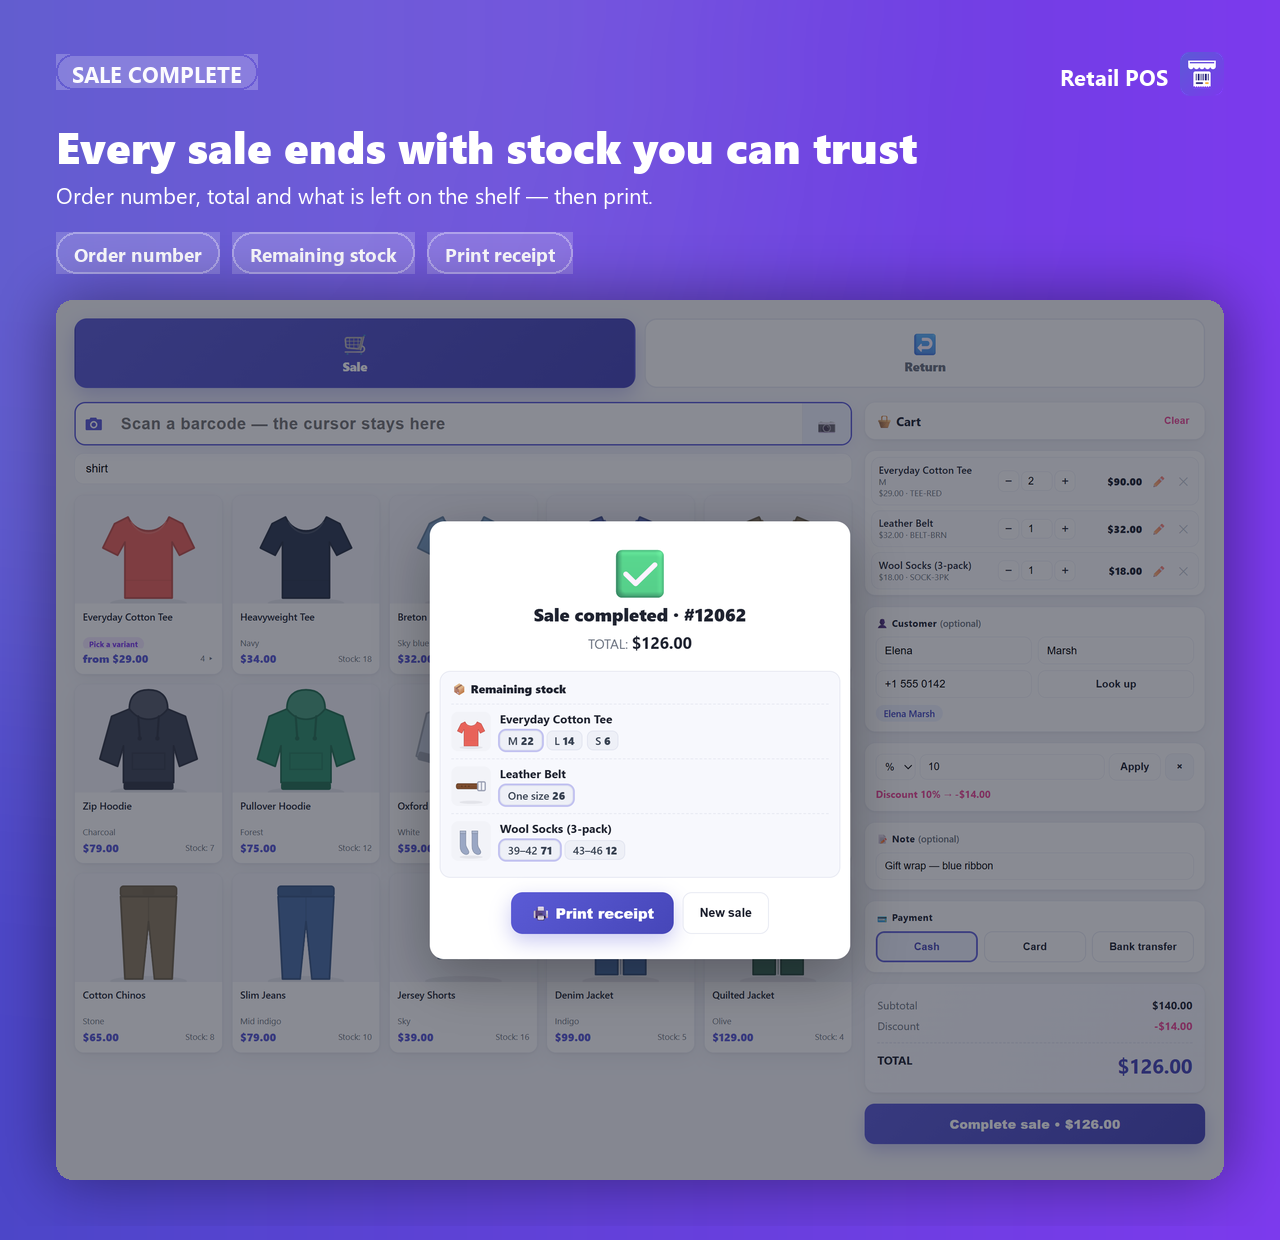
The remaining-stock snapshot
After each sale you get a card per product you sold, listing every variation of it with the stock left over — not just the one that went over the counter. It is the quickest way to catch a bad count: if the medium says 40 and the shelf is empty, you know before the customer is out of the door.
The receipt
Print opens a narrow monospace window sized for a roll of thermal paper and sends it to your browser's own print dialog, so any printer your browser can print to — a thermal roll printer included — will do. There is no driver-level or ESC/POS integration.
On the paper: your store name, address and phone; the order number and date; each line item with its quantity and amount; the subtotal and the discount when there was one; the TOTAL; the payment method; and the customer's name and phone. Line amounts are the pre-discount figures so the paper adds up the way a customer checks it — items total to Subtotal, minus Discount equals TOTAL.
Any past POS sale can be reprinted later from the orders list.
Scanning
Scanner guns (USB or Bluetooth)
Any HID scanner that types into a text field works — the ordinary USB or Bluetooth kind — with nothing to configure and no driver to install. You do not need to program an Enter suffix into it: the box fires on its own at four or more characters, and on Enter as well.
They will not auto-fire. Press Enter after typing one. On the Labels screen the auto-fire threshold is six characters.
The phone or tablet camera
There is no app to install. Tap the 📷 button on the scan box and a live viewfinder opens.
- Browsers with a built-in BarcodeDetector (typically Android Chrome) decode natively. Where there is none (typically iOS Safari) the bundled ZXing library decodes instead — it ships inside the plugin, nothing loads from a CDN.
- Both are set up for Code 128, EAN-13, EAN-8, UPC-A, UPC-E, Code 39, ITF and QR.
- The view uses the rear camera at up to 1920×1080, crops the middle band of the frame, alternates horizontal and vertical passes, and turns on continuous autofocus where the device supports it.
- Zoom and torch buttons appear when the phone exposes them. The phone vibrates on a successful read where the browser allows it.
- “Read from photo” is the fallback for a creased, faded or too-small label: take a still — or pick one from the gallery — and it is retried at three sizes and four rotations, twelve attempts in all, before it gives up.
- Camera scanning is available on the Sell and Returns screens. The Labels screen takes a hardware scanner or a typed code.
What a scanned code is matched against
- The product's barcode field (
_barcode) — the fast path this plugin maintains. - WooCommerce's own GTIN field (
_global_unique_id). - The SKU.
- Finally, WooCommerce's own SKU index.
Only published products and variations ring up, and a variation always wins over its parent.
When a code is not found
You get an on-screen message rather than a dialogue to dismiss, and the box is ready for the next scan. What to do:
- Search the item by name instead and sell it that way — the sale is not blocked by a missing barcode.
- Check the code is actually stored on the product (or on the exact variation), with no stray spaces.
- Check the product is published, not a draft.
- If your barcodes are your SKUs, turn on Keep the barcode in sync with the SKU in Settings and re-save the product.
- Print your own label for it — see Barcode labels.
Customers
Identity at a counter is a phone number, so that is what the customer box asks for. All of it is optional — a sale needs no customer at all.
- Type first name, last name and phone. Press Look up (or just leave the phone field) and if a WooCommerce customer has that number as their billing phone, the sale is linked to that customer account.
- If nobody matches, the order simply carries the name and phone you typed. No account is ever created — nobody at the till is forced to register.
- A country code set in Settings normalises local formats such as
05xx…so the same person is found however the number was typed.
E-mail behaviour
- POS orders do not send the customer the usual WooCommerce order e-mails. The person is standing in front of you with a printed receipt.
- The admin-facing new-order, no-stock and backorder notifications are also suppressed for POS orders: a shop ringing 200 sales a day should not mail its owner 200 times about transactions they were present for. Your website orders are unaffected — they still send everything they always sent.
The e-mail suppression is keyed to the POS marker on the order. Every ordinary WooCommerce order keeps sending exactly what it always sent.
Returns
Open Retail POS → Returns. Returns here are blind: no original order is needed, and no receipt. Scan what the customer brings back, hand over the money, done.
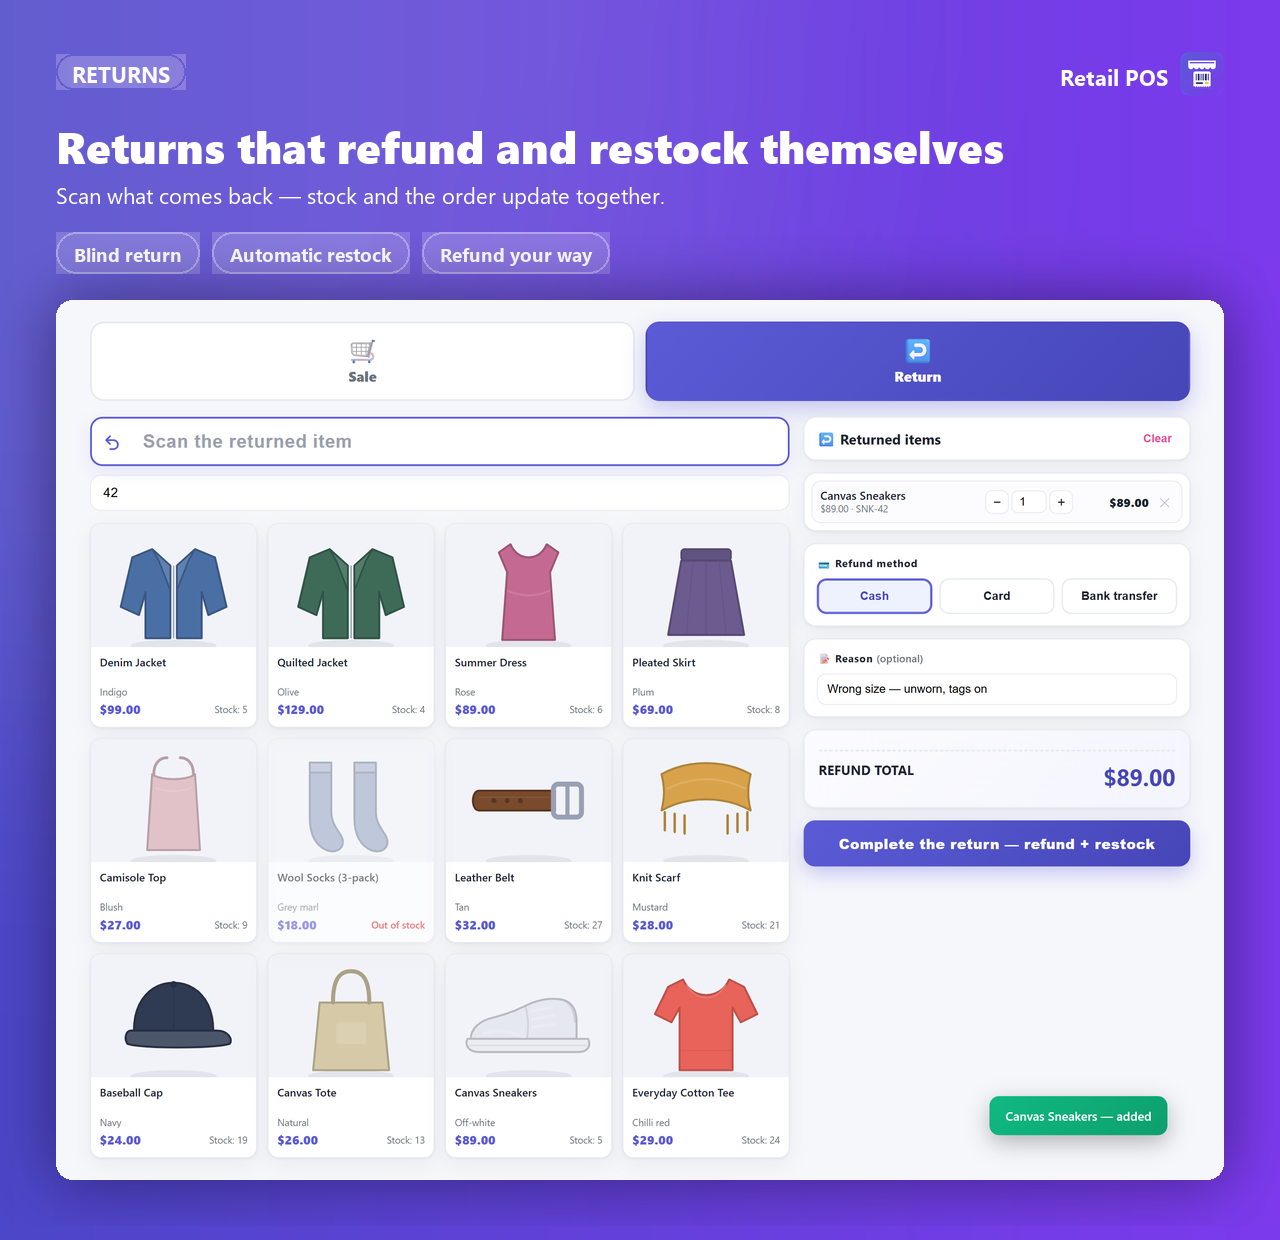
- Scan or search what came back Same scan box, same camera, same product search as the sale screen.
- Choose the refund method The same tender list as a sale — how the money is actually leaving the till.
- Add a reason (optional) A free-text line, recorded with the return.
- Complete the return The payout is documented as a refunded POS order, so the day's figures stay honest, and stock goes back up.
What is refunded, and what is restocked
- The refund total is worked out from the returned items at their current WooCommerce prices, with tax calculated by WooCommerce — the same money path as a sale.
- Stock is restored automatically when “Reduce stock automatically on sale” is on in Settings. That single setting governs both directions: if a sale never took stock down, a return must not put it up, or every sell-then-return round trip would invent inventory. The order note records which of the two happened.
- The return can be printed like any receipt, and it appears in the orders list under the Return type.
A customer can bring back three of something you currently hold none of, exactly as a real counter has to allow. The sale screen caps quantities; the returns screen deliberately does not.
Barcode labels
Retail POS → Labels prints scannable price labels for any product that already has a SKU or a barcode, at your label size, from the machine at the counter.
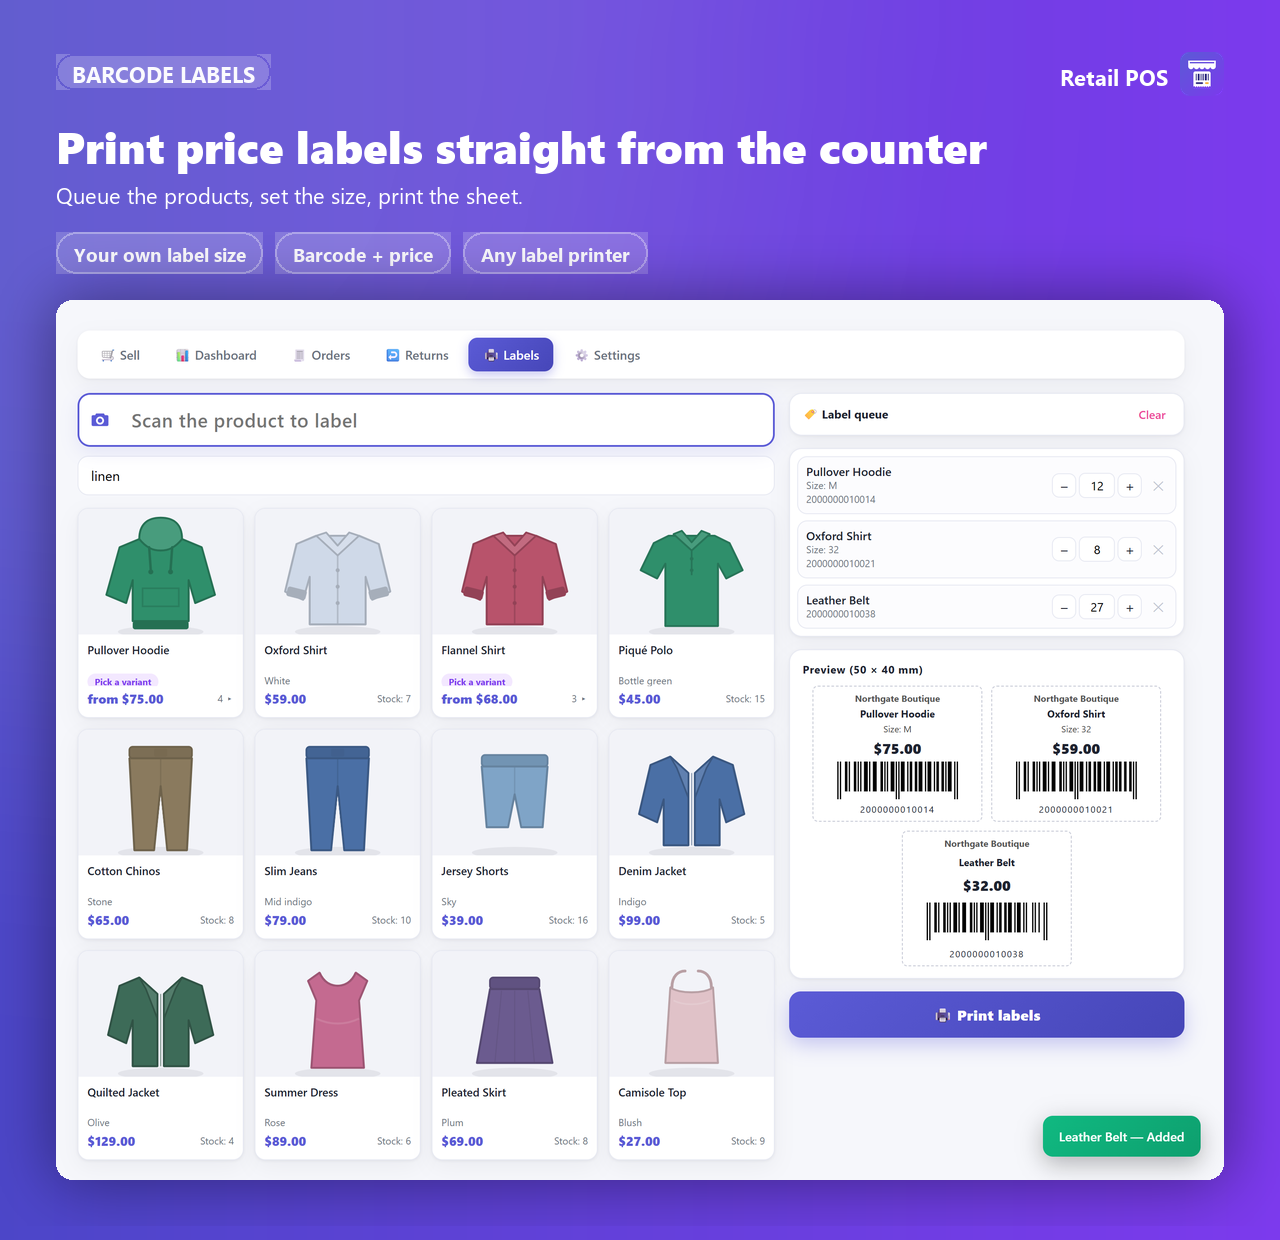
- Queue the products Scan them with a hardware scanner, or search by name or SKU. The scan box here auto-fires at six characters or more, and on Enter.
- Set the copies Each queued row has a − / + stepper and a number box. Scanning the same product again also bumps its count.
- Check the preview One sample label per product is rendered at the exact millimetre size from Settings.
- Print A print window opens with every copy laid out, and closes itself when the print dialogue is done.
Symbologies, size and content
- The renderer auto-detects EAN-13 (13 digits) and EAN-8 (8 digits) and falls back to Code 128 for anything else — including alphanumeric SKUs.
- Label width and height in millimetres are set in Settings (50 × 40 mm to start with).
- What appears on the sticker is a set of tick-boxes: store name, product name, variant, price, the barcode bars and the barcode digits.
- A product with no SKU and no barcode is queued but says so — give it a code on the product screen first.
POS orders
Retail POS → Orders is every counter transaction — sales and returns — in one table, without wading through the website's orders.
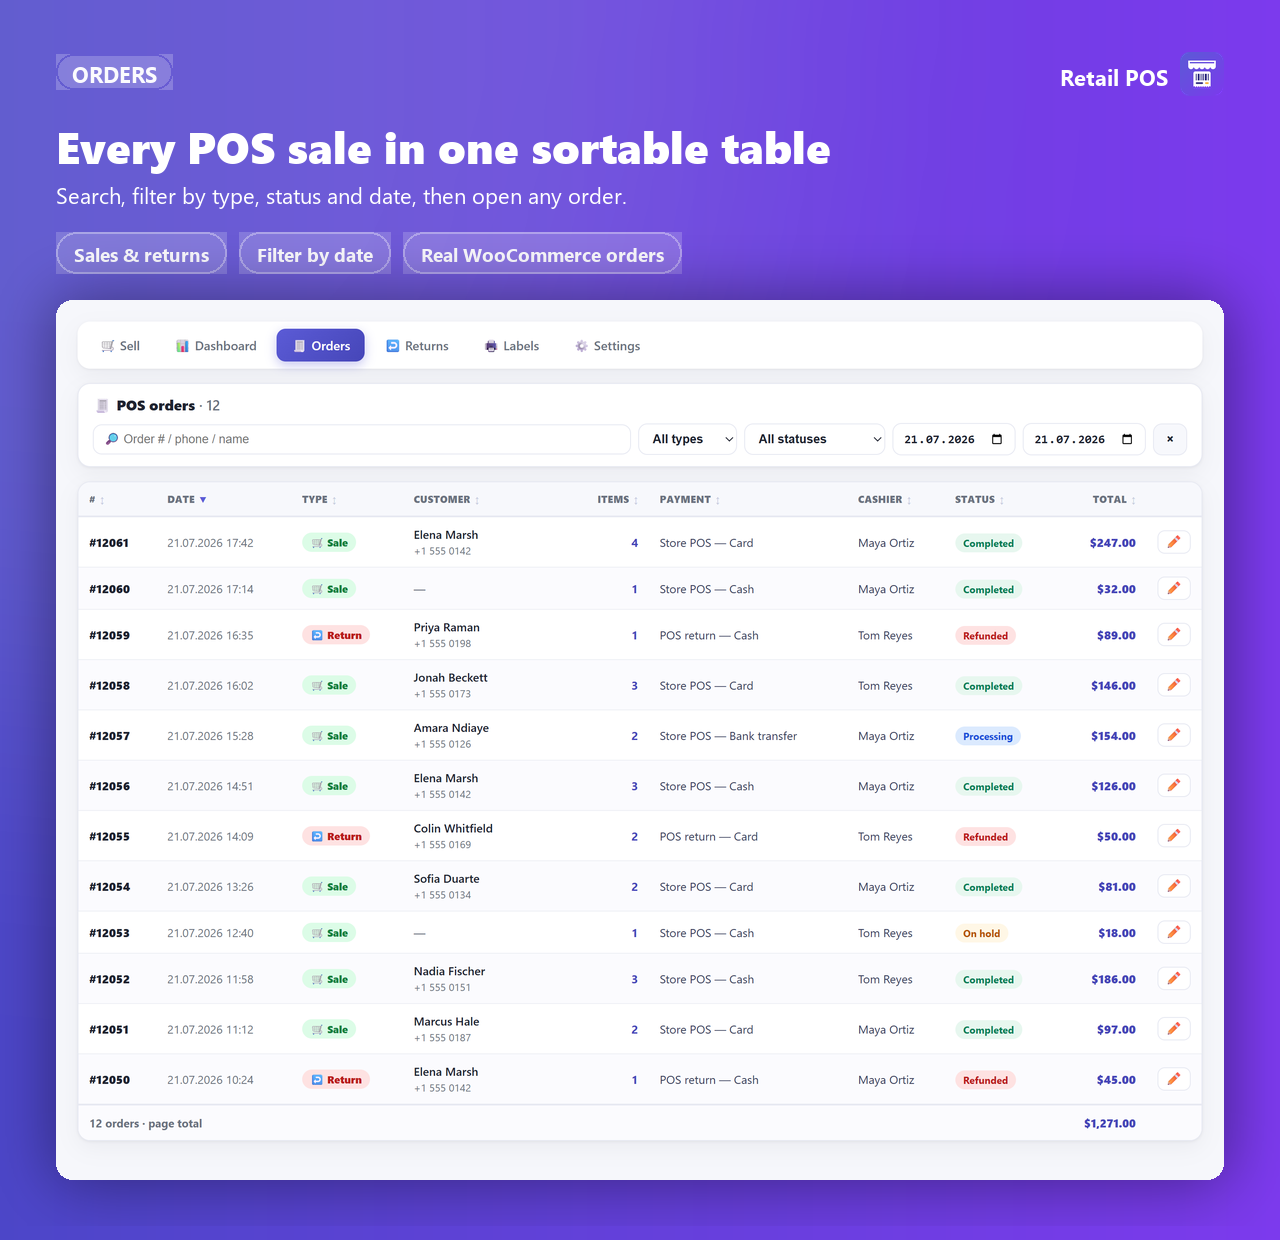
Finding an order
- Search by order number, phone, or customer name and e-mail.
- Type: all, 🛒 Sale, or ↩️ Return.
- Status: Completed, Processing, On hold, Pending, Refunded, Cancelled.
- Date: a from / to range. The × button clears every filter at once.
What may be edited here, and what stays in WooCommerce
Editing on this screen is deliberately limited to the things a cashier gets wrong in a hurry:
| Editable from the POS panel | Only on WooCommerce's own order screen |
|---|---|
| Customer first and last name, phone, e-mail, city · payment method · order status · adding a note | Line items, quantities, prices, tax, refunds against the order, addresses beyond the above, everything else |
- Every edit writes an order note recording what changed and who changed it.
- Changing the payment method keeps the day's tender breakdown honest — it re-points the order at another tender rather than editing a label.
- The panel also reprints the receipt for that order.
POS sales are normal WooCommerce orders tagged as POS, so they appear in your usual order list, your reports and your integrations. Anything WooCommerce can do to an order, you can still do to these — on WooCommerce's own screen.
Dashboard
Retail POS → Dashboard answers "how did the shop do?" without exporting anything.
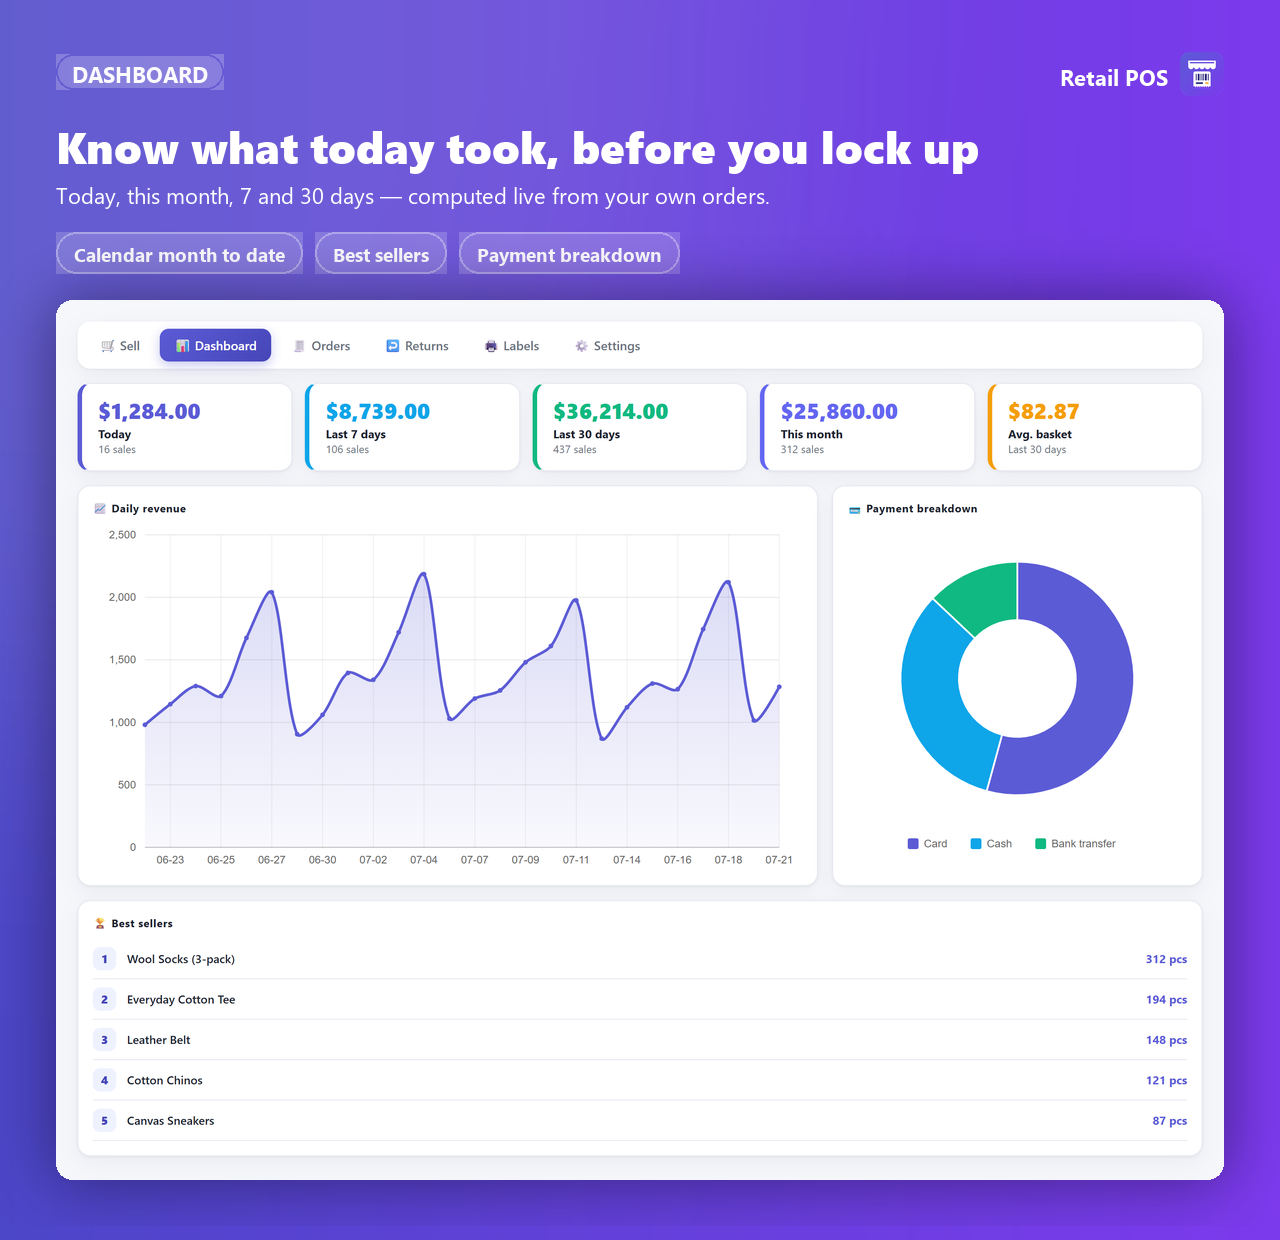
The four time buckets
| Bucket | Window |
|---|---|
| Today | From midnight in your site's timezone. The day is checked against the site clock, so a daylight-saving shift cannot smear yesterday into today. |
| Last 7 days | A rolling seven days, ending today. |
| Last 30 days | A rolling thirty days, ending today. |
| This month | The calendar month to date — from the 1st, which is the figure an accountant asks for. |
What is netted out
Every bucket is net: a POS return subtracts its whole value, and a partial refund against a sale that stays Completed subtracts only the refunded part. The number on the screen is what actually stayed in the till, not what was rung up.
The charts
- Daily revenue — a line across the window, one point per day, net of returns.
- Payment mix — the split across your tenders. A cash refund is subtracted from cash, because that is the drawer it left.
- Average basket — takings divided by the number of sales over the 30-day window.
- Best sellers — the top products by units sold, ranked.
Languages
- Every string in the plugin is translatable, and the free package ships its translation template only (
languages/eren-labs-retail-pos-for-woocommerce.pot). - Translations are served as WordPress.org language packs from translate.wordpress.org — nothing is bundled, so you always get the current community translation, and it updates without a plugin update.
- A language switcher sits in the header of the POS screens: a flag pill offering Automatic plus English, Türkçe, Español, Deutsch, Français, Italiano, Português (Brasil) and العربية. The choice is saved per user.
- It changes this plugin only — the rest of wp-admin stays in the site language, so a Turkish-speaking cashier and an English-speaking manager can share one WordPress.
- On Automatic the plugin follows the language WordPress is already showing that user, falling back to the closest language it serves, and to English otherwise.
- Right-to-left languages (Arabic, Hebrew, Farsi, Urdu, Pashto) get an RTL layout on the POS screens.
The switcher shows what the plugin can be read in; the actual words come from the language pack WordPress has installed. Where a pack is not installed yet, that language falls back to English.
What Pro adds
The free plugin is a complete till for one counter: scan, sell, return, label, report. Pro is for a full-day retail floor — several tenders on one sale, customers who pay later, a cash drawer that has to balance at night, and the profit behind the revenue.
Pro is a separate build you install over the free one; it keeps all your settings and data. See Licence & billing for how to get it, or the pricing page.
In-store (POS) pricing PRO
Ring items up at a counter price that is distinct from the website price. Set it per product on the WooCommerce product editor (and per variation), or generate it across the whole catalogue in bulk: the site price ± a percentage, with optional rounding — nearest 0.10, 0.50, 1 or 5, or charm endings such as .90, .99 and 9.90. The website price is never changed.
Split payments PRO
Settle one sale with several tenders — half cash, half card — each one recorded as its own row against the order, so the day's cash figure is the cash that actually went in the drawer rather than the value of every sale that involved cash. FREE In the free version a sale is settled by exactly one method covering the full total.
Partial payment & the customer credit ledger PRO
Take what the customer has now and book the remainder to their account. Pro adds an append-only credit ledger keyed to the customer's phone: a debtor list with aging, collections against a balance, printable statements, and WhatsApp reminders. Balances are held in the plugin's own tables, not in a spreadsheet behind the till.
Cash register & end of day PRO
Open the drawer with a float, record cash-ins and expenses during the day, and close it against an expected figure: opening + cash tenders (sales and collections, minus refunds) + cash in − expenses. You count, the screen compares, and the difference carries over. Because it counts cash tenders rather than whole orders, a half-cash split sale contributes only its cash part.
Exchange terminal PRO
A dedicated screen for the "this one, but a size up" transaction. Scan what comes back and what goes out; returned items go back to stock, given items sell, and the tax-correct difference is either collected or refunded — in one document instead of a return plus a sale.
Campaign scenarios PRO
Preset one-tap discount chips instead of typing a percentage each time: "buy 3 pay 2", "every 2nd item −50%", and your own percentage or fixed presets. The cashier taps the campaign; the arithmetic is the server's problem. FREE The free version has manual percentage and fixed-amount discounts.
Profit reports PRO
Revenue is not the number that matters. Pro adds a gross-to-net waterfall, tax-exclusive and refund-netted profit and margin, sell-through and stock turnover, inventory valuation, basket affinity, discount leakage, and breakdowns by time, attribute and cashier. Cost of goods comes from the _wc_cog_cost or _cost product meta — the same field the free quick edit writes when you type a cost, with a variation-to-parent fallback.
Store activity feed PRO
Every sale, return, exchange and on-account movement of the day in one chronological stream, so a manager can see what happened at the counter without opening orders one by one.
Ready for the full counter?
Pro is an annual licence, and the price covers the sites you actually run. Details, including what happens when it lapses, are in Licence & billing.
Licence & billing
What a licence covers
One annual Pro licence gives you the Pro build, automatic updates and priority e-mail support for the number of sites on your plan. All Pro features are in every plan — the only difference is how many sites may run it at once.
| Plan | Sites | Price, per year | Checkout |
|---|---|---|---|
| Single | 1 | $99 | Buy the Single plan, 1 site, $99 per year |
| Five | 5 | $299 39% OFF | Buy the Five plan, 5 sites, $299 per year |
| Twenty | 20 | $699 64% OFF | Buy the Twenty plan, 20 sites, $699 per year |
The free version stays free and complete for one counter — no trial clock, no card, nothing switched off after 14 days.
Buying and installing Pro
- Check out Payment is handled by Freemius, our merchant of record — card and PayPal, proper invoices, and the tax handled for your country.
- Install the Pro build Your licence key and a download link arrive by e-mail. Upload the Pro zip at
Plugins → Add New → Upload; it installs over the free version and keeps your settings, orders and data. - Activate Enter the key when the plugin asks for it, and Pro unlocks — with automatic updates from then on.
Moving, renewing, lapsing
- Moving a site: deactivate the licence on the old site to free an activation, then enter the key on the new one.
- Renewal: the licence renews annually. Invoices, renewal and one-click cancellation are in your Freemius account.
- If it lapses: the plugin does not delete anything and your orders, ledger and register data stay in your database. You stop receiving Pro updates and priority support, and Pro features stop unlocking — reverting to the free build leaves you with a working till.
- Refunds: see the refund policy.
Data & privacy
The free version contacts nothing
No account, no API key, no licence check, no analytics, no telemetry — the free package ships no licensing or tracking code of any kind. Sales, customers, orders, settings and reports are stored only in your own WordPress database.
What Pro's Freemius opt-in does and does not send
The Pro build — obtained from erenlabs.net, not from WordPress.org — uses the Freemius SDK for licence validation, automatic updates and optional usage tracking.
- On first activation Pro shows an explicit opt-in screen. Nothing is sent anywhere unless you press “Allow & Continue.” Choosing Skip keeps the plugin fully functional with no data leaving your site.
- If you opt in, Freemius receives basic site data: site URL, WordPress and PHP versions, plugin version and the admin e-mail address — for licence checks, update notifications and support.
- Your sales, customers, credit ledger and reports are never sent.
- Freemius terms and privacy policy.
What uninstall removes
- Deactivating changes nothing at all.
- Deleting the plugin removes its own options, its own capability, its own scheduled events, and — on Pro — its own tables (the credit ledger, the register and the payment rows).
- Your products, stock, customers and orders stay exactly as they are, including the POS ones: they are ordinary WooCommerce orders and always were. Order and product meta the POS wrote stays too, because it documents real transactions.
- If the free and Pro builds are both installed side by side, removing one leaves the shared data alone — the last one removed does the cleanup.
The credit ledger and the cash-register history live in the plugin's own tables, so deleting the plugin deletes them. Print or export anything you need to keep first. Your WooCommerce orders are never affected.
Troubleshooting
I scan and nothing appears in the box
Click once inside the scan box — or anywhere on the empty background of the screen, which sends focus back to it — and scan again. If the field is empty but the code never arrives, the scanner is probably not in HID keyboard mode: open a plain text field (a new post, say), scan, and see whether the digits appear there. If they do not, the scanner needs to be configured, not the plugin.
If the digits arrive but nothing is added, the code may be shorter than four characters — press Enter after it. On the Labels screen the auto-fire threshold is six characters.
The camera will not open on an iPhone
Browsers only release the camera on a secure connection: the site must be served over HTTPS. A wp-admin loaded over plain HTTP, or through a local IP address, cannot open a viewfinder at all.
Then check the permission: in iOS, Settings → Safari → Camera should be "Ask" or "Allow", and the site itself must not have been denied earlier (tap the aA menu in the address bar → Website Settings). If the viewfinder still fails, the status line under it shows the browser's own reason.
iOS Safari has no built-in barcode decoder, so the plugin decodes with the bundled ZXing library — dense Code 128 on a small label may need the zoom button, better light, or “Read from photo”, which retries the image twelve ways.
A code is scanned but the product is not found
A code is matched against the product's barcode field, WooCommerce's GTIN field, the SKU, and then WooCommerce's SKU index. If none of them holds that exact number, nothing matches.
Check that the code is stored on the product — or on the exact variation, not just the parent — with no leading or trailing spaces, and that the product is published (drafts never ring up). If your barcodes are your SKUs, turn on Keep the barcode in sync with the SKU in Settings and re-save the product. Meanwhile you can always search the item by name and sell it that way.
The prices at the till do not match the product page
That is almost always the tax basis. The counter always quotes gross — the tax-inclusive amount the customer hands over — even when your shop is set to display prices excluding tax on the website. So a $30 shelf price displayed ex-tax shows as $36 at the till on a 20% rate, and $36 is what the order charges.
The tax itself is WooCommerce's: your rates, classes and rules apply unchanged. A discount scales the line totals proportionally rather than adding a negative fee line, so a mixed-rate basket still computes correctly.
If a quick edit seems to move a price on its own, it does not: the figure you type is converted back to WooCommerce's own entry basis before it is saved, so opening a line and saving it untouched is a no-op.
I sold something and stock did not move
Three things to check, in order. First, Settings → Reduce stock automatically on sale — if it is off, no POS sale takes stock down and no POS return puts it back.
Second, the product itself: WooCommerce only tracks a figure for products with stock management enabled. An untracked product has no quantity to reduce — which is also why it has no cap in the cart.
Third, if it is a variable product, check whether stock is managed on the variation or pooled at the parent, and look at the remaining-stock card the sale screen shows you afterwards: it lists every variation, which is usually where the surprise is.
The receipt window is blank, or never appears
The receipt opens in a new browser window, so a pop-up blocker will stop it. Allow pop-ups for your own admin address and press Print again.
If a window opens but the print dialogue produced an empty page, print once more from that window (Ctrl/Cmd + P) — it is already rendered by then. Check too that the store name and address are filled in under Retail POS → Settings, since they are the header of the paper.
The receipt prints through your browser's ordinary print dialogue, so the paper size and margins are your printer driver's settings, not the plugin's. For labels, set the millimetre size in Settings and disable your browser's headers and footers for a clean sticker.
Can two people use the till at once?
Yes — it is a normal WordPress admin screen, so any number of staff with the WooCommerce manager capability can have it open. Each sale is its own order, and the order records which user rang it up.
Does it work offline?
No. Every scan, search and sale is a request to your WordPress site, so if the connection at the counter drops, the terminal stops with it.
Get support
If something here did not answer it, we would rather hear about it than have you guess. There is also a Help & support page inside the plugin, under the Retail POS menu, with the questions we get most.
- Free users: the support forum on WordPress.org.
- Pro users: priority e-mail support — support@erenlabs.net, or the contact button on the plugin's Help & support page.
Telling us your WordPress and WooCommerce versions, which screen you were on, and what you expected to happen usually gets a useful answer on the first reply.